3. Installation
3.1. Introduction
This section is meant to provide guidance on installing MET. It assumes a beginner user to MET is compiling MET from scratch and will step through the installation process, including listing dependent libraries and how to install them. Installation will require an understanding of the environment and hardware that MET is being installed on as it has options that are dependent on compiler usage, modulefiles, etc.
There are multiple supported methods for installing MET: using a provided compilation script, Docker instances, and Apptainer instances. All of these methods will be described below. The recommended method is using the provided Using the compile_MET_all.sh script.
Some organizations have access to precompiled versions of MET on shared systems, making the need for self-installation unnecessary. Users should check the METplus Downloads page for the latest coordinated release’s Existing Builds page for existing MET installations before continuing.
3.2. Required External Libraries
MET is dependent on several external libraries to function properly. The required libraries are listed below:
BUFRLIB for reading PrepBufr Observation files
NetCDF4 in C and CXX, for intermediate and output file formats
HDF5 is required to support NetCDF 4. HDF5 should be built with zlib
GSL GNU Scientific Library Developer’s Version for computing confidence intervals (use GSL-1.11 for PGI compilers)
Proj Library used to instantiate grids within MET
The following libraries are conditionally required, depending on the intended verification use and compiler language:
GRIB2C Library (with dependencies Z, PNG, JASPER), if compiling GRIB2 support
Python Libraries, if compiling support for Python embedding
ecKit Library, if compiling support for unstructured grids
ATLAS Library, if compiling support for unstructured grids
HDF4 library if compiling the MODIS-Regrid or lidar2nc tool
HDF-EOS2 library if compiling the MODIS-Regrid or lidar2nc tool
Cairo library if compiling the MODE-Graphics tool
FreeType library if compiling the MODE-Graphics tool
f2c library for interfacing between Fortran and C (Not required for most compilers)
Users can take advantage of the compilation script to download and install all of the libraries automatically, both required and conditionally required Using the compile_MET_all.sh script.
3.3. Suggested External Utilities
The following utilities have been used with success by other METplus users in their verification processes. They are not required for MET to function, but depending on the user’s intended verification needs, they may be of use:
copygb utility for re-gridding GRIB version 1 data
wgrib2 utility for re-gridding GRIB version 2 data
Integrated Data Viewer (IDV) for displaying gridded data, including GRIB and NetCDF
ncview utility for viewing gridded NetCDF data (e.g. the output of pcp_combine)
3.4. Using the compile_MET_all.sh script
The compile_MET_all.sh script is designed to install MET and, if desired, all of the external library dependencies required for running the system on various platforms. There are some required environment variables that need to be set before running the script and some optional environment variables, both of which are described below. The script relies on a tar_files.tgz file, which contains all of the required and optional library packages for MET but not MET itself. A separate command will be used to pull down the latest version of MET in tar_files.tgz format from GitHub, which the script will then install.
To begin, create and change to a directory where the latest version of MET will be installed. Assuming that the following guidance uses “/d1” as the parent directory, a suggested format is a path to a “met” directory, followed by the version number subdirectory (e.g. /d1/met/12.0.0). Next, download the compile_MET_all.sh script and tar_files.tgz file and place both of these files in the new directory. These files are available either through using the hyperlinks provided or by entering the following commands in the terminal while in the directory MET will be installed in:
wget https://raw.githubusercontent.com/dtcenter/MET/main_v12.0/internal/scripts/installation/compile_MET_all.sh
wget https://dtcenter.ucar.edu/dfiles/code/METplus/MET/installation/tar_files.tgz
The tar files will need to be extracted in the MET installation directory:
tar -zxf tar_files.tgz
To make the compilation script into an executable, change the permissions to the following:
chmod 775 compile_MET_all.sh
Now change directories to the one that was created from expanding the tar files:
cd tar_files
The next step will be to identify and download the latest MET release as a tar file (e.g. v12.0.0.tar.gz) and place it in the tar_files directory. The file is available from the MET line under the “RECOMMENDED - COMPONENTS” section on the METplus website or by using a wget command while in the tar_files directory:
wget https://github.com/dtcenter/MET/archive/refs/tags/v12.0.0.tar.gz
3.4.1. Environment Variables to Run Script
Before running the compilation script, there are five environment variables that are required: TEST_BASE, COMPILER, MET_SUBDIR, MET_TARBALL, and USE_MODULES. If compiling support for Python embedding, the script will need the following additional environment variables: MET_PYTHON, MET_PYTHON_CC, and MET_PYTHON_LD. All of these environment variables are discussed in further detail in the Environment Variable Descriptions section below. An easy way to set these environment variables is in an environment configuration file (for example, install_met_env.<machine_name>). An example environment configuration file to start from (install_met_env.generic_gnu), as well as environment configuration files used on HPCs at NCAR and NOAA, can be found in the MET GitHub repository in the scripts/installation/config directory.
3.4.2. Environment Variable Descriptions
REQUIRED
TEST_BASE – Format is /d1/met/12.0.0. This is the MET installation directory that was created the beginning of, Section 3.4 and contains the compile_MET_all.sh script, tar_files.tgz, and the tar_files directory from the untar command.
COMPILER – Format is compiler_version (e.g. gnu_8.3.0). For the GNU family of compilers, use “gnu”; for the Intel family of compilers, use “intel”, “intel-classic”, “intel-oneapi”, “ics”, “ips”, or “PrgEnv-intel”, depending on the system. If using an Intel compiler, users that have also set the USE_MODULES environment variable to TRUE should review the additional information below for proper configuration file setup. In the past, support was provided for the PGI family of compilers through “pgi”. However, this compiler option is no longer actively tested.
MET_SUBDIR – Format is /d1/met/12.0.0. This is the location where the top-level MET subdirectory will be installed and is often set equivalent to TEST_BASE (e.g. ${TEST_BASE}).
MET_TARBALL – Format is v12.0.0tar.gz. This is the name of the downloaded MET tarball.
USE_MODULES – Format is TRUE or FALSE. Set to FALSE if using a machine that does not use modulefiles; set to TRUE if using a machine that does use modulefiles. For more information on modulefiles, visit the Wikipedia page. If the USE_MODULES setting is set to true and the compiler is an Intel compiler, please review the additional information below for proper configuration file setup.
PYTHON_MODULE - Format is PythonModuleName_version (e.g. python_3.10.4). This environment variable is only required if USE_MODULES = TRUE. To set properly, list the Python module to load followed by an underscore and version number. For example, setting PYTHON_MODULE =python_3.10.4 will cause the script to run “module load python/3.10.4”.
ADDITIONAL SETTINGS FOR INTEL COMPILER USERS WITH THE USE_MODULES SETTING
It is necessary for the user to specify (in the install_met_env.<machine> config file) the following environment variables if using the Intel compilers:
This is due to the machines allowing users to load a module but not setting these environment variables as expected, leading to failed installations. For user convenience, additional generic configuration files have been created that include these settings. Users with a classic Intel compiler are encouraged to use the install_met_env.generic_intel_classic configuration file, and users with a oneAPI Intel compiler should use the install_met_env.generic_intel_oneapi configuration file.
REQUIRED, IF COMPILING PYTHON EMBEDDING
MET_PYTHON – Format is /usr/local/python3. This is the location containing the bin, include, lib, and share directories for Python.
MET_PYTHON_CC - Format is -I followed by the directory containing
the Python include files (ex. -I/usr/local/python3/include/python3.10).
This information may be obtained by
running python3-config --cflags;
however, this command can, on certain systems,
provide too much information.
MET_PYTHON_LD - Format is -L followed by the directory containing
the Python library
files then a space, then -l followed by the necessary Python
libraries to link to
(ex. -L/usr/local/python3/lib/\ -lpython3.10\
-lpthread\ -ldl\ -lutil\ -lm).
The backslashes are necessary in the example shown because of
the spaces, which will be
recognized as the end of the value unless preceded by the “\”
character. Alternatively,
a user can provide the value in quotations
(e.g. export MET_PYTHON_LD=”-L/usr/local/python3/lib/
-lpython3.10 -lpthread -ldl -lutil -lm”).
This information may be obtained by running
python3-config --ldflags --embed; however,
this command can, on certain systems, provide too much information.
OPTIONAL
export MAKE_ARGS=”-j #” – If there is a need to install external libraries, or to attempt to speed up the MET compilation process, this environmental setting can be added to the environment configuration file. Replace the # with the number of cores to use (as an integer) or simply specify “export MAKE_ARGS=-j” with no integer argument to start as many processes in parallel as possible. Note that Docker has trouble compiling without a specified value of cores to use. The automated MET testing scripts in the Docker environment have been successful with a value of 5 (ex. export MAKE_ARGS=”-j 5”).
3.4.3. External Library Handling in compile_MET_all.sh
IF THE USER WANTS TO HAVE THE COMPILATION SCRIPT DOWNLOAD THE LIBRARY DEPENDENCIES
The compile_MET_all.sh script will compile and install MET and its Required External Libraries, if needed. Note that if these libraries are already installed somewhere on the system, MET will call and use the libraries that were installed by the script.
IF THE USER ALREADY HAS THE LIBRARY DEPENDENCIES INSTALLED
If the required external library dependencies have already been installed and don’t need to be reinstalled, or if compiling MET on a machine that uses modulefiles and the user would like to make use of the existing dependent libraries on that machine, there are more environment variables that need to be set to let MET know where those library and header files are. The following environment variables need to be added to the environment configuration file:
Feature |
Configuration Option |
Environment Variables |
|---|---|---|
Always Required |
MET_BUFRLIB, BUFRLIB_NAME, MET_PROJ, MET_HDF5, MET_NETCDF, MET_GSL |
|
Optional GRIB2 Support |
|
MET_GRIB2CLIB, MET_GRIB2CINC, GRIB2CLIB_NAME, LIB_JASPER, LIB_PNG, LIB_Z |
Optional Python Support |
|
MET_PYTHON_BIN_EXE, MET_PYTHON_CC, MET_PYTHON_LD |
Optional Unstructured Grid Support |
|
MET_ATLAS, MET_ECKIT |
Optional LIDAR2NC Support |
|
MET_HDF |
Optional MODIS Support |
|
MET_HDF, MET_HDFEOS |
Optional MODE Graphics Support |
|
MET_CAIRO, MET_FREETYPE |
Generally speaking, for each library there is a set of three environment variables that can describe the locations: $MET_<lib>, $MET_<lib>INC and $MET_<lib>LIB.
The $MET_<lib> environment variable can be used if the external library is installed such that there is a main directory which has a subdirectory called lib containing the library files and another subdirectory called include containing the include files.
Alternatively, the $MET_<lib>INC and $MET_<lib>LIB environment variables are used if the library and include files for an external library are installed in separate locations. In this case, both environment variables must be specified and the associated $MET_<lib> variable will be ignored.
FINAL NOTE ON EXTERNAL LIBRARIES
For users wishing to run the Plot-MODE-Field tool, the Ghostscript font data must be downloaded and the MET_FONT_DIR environment variable in the install_met_env.<machine_name> file should point to the directory containing those fonts.
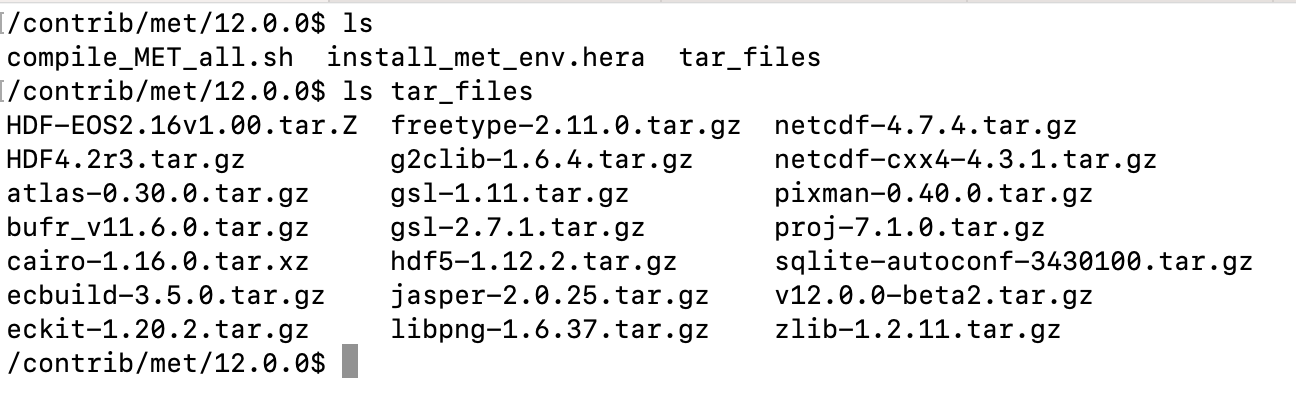
3.4.4. Executing the compile_MET_all.sh script
With the proper files downloaded and the environment configuration file set to the particular system’s needs, MET is ready for installation. The screenshot below shows the contents of the installation directory followed by the tar_files subdirectory at this step on the machine ‘hera’.
Simply enter the following into the terminal to execute the script:
./compile_MET_all.sh install_met_env.<machine_name>
The screenshot below shows the contents of the installation directory after installation:

To confirm that MET was installed successfully, run the following command from the installation directory to check for errors in the test file:
grep -i error MET12.0.0/met.make_test.log
If no errors are returned, the installation was successful. Due to the highly variable nature of hardware systems, users may encounter issues during the installation process that result in MET not being installed. If this occurs please first recheck that the location of all the necessary data files and scripts is correct. Next, recheck the environment variables in the environment configuration file and ensure there are no spelling errors or improperly set variables. After these checks are complete, run the script again.
If there are still errors, users still have options to obtain a successful MET installation. Check the FAQ section of the User’s Guide on topics relevant to installation. Next, review previously asked questions on the installation topic in GitHub Discussions. Users are welcome to post any questions they might have that have not been asked. Finally, consider one of the remaining installation methods for MET, as these may prove more successful.
3.5. Using Docker for Running MET
Docker is a system that seeks to eliminate some of the complexities associated with downloading various software and any library dependencies it might have by allowing users to run inside a preset container. Instead of using a hard copy of an application, Docker allows users to pull images of the application and run those within the Docker environment. This is beneficial to both developers (who no longer have to design with every possible system environment in mind) and users (who can skip tracking down system environment settings and meet with success faster) alike.
MET has numerous version images for Docker users and continues to be released as images at the same interval as system releases. While the advantages of Docker can make it an appealing installation route for first time users, it does require privileged user access that will result in an unsuccessful installation if not available. Please ensure the user has high system access (e.g. admin access) before attempting this method.
3.5.1. Installing Docker
To begin, download and install the correct version of Docker for the intended system. The Docker installation webpage should detect what system is accessing the webpage and auto select the appropriate version. If a different version is required, select the correct version from the dropdown option. Follow Docker’s instructions for a successful installation.
3.5.2. Loading the Latest Docker Image of MET
Once the installation of Docker has been confirmed to be successful, all that’s needed to run MET is to download the latest image of MET in Docker. To accomplish that, use the pull command, with the latest MET version number, for example:
docker pull dtcenter/met:12.0.0
Omitting the version number will result in an error due to Docker’s behavior of attempting to retrieve an image with the “latest” tag, which MET no longer uses.
3.5.3. Running the Docker version of MET
All that is left to do is launch a shell in the Docker container. This is accomplished with the command:
docker run -it --rm dtcenter/met /bin/bash
Note that the “–rm” command was added to automatically remove the container created from the image once exiting Docker. Simply remove this command if the container should persist after exiting. If there is an error during this run command, try adding the latest MET version number the same way the latest image of MET was pulled:
docker run -it --rm dtcenter/met:12.0.0 /bin/bash
If the usage MET via Docker images was successful, it is highly recommended to move on to using the METplus wrappers of the tools, which have their own Docker image. Instructions for obtaining that image are in the METplus Wrappers User’s Guide.
3.6. Using Apptainer for Running MET
Similar to Docker, Apptainer (formerly Singularity) removes some of the complexities associated with downloading various library dependencies and runs inside a preset container. Apptainer is incredibly flexible and was designed to function on High Performance Computing (HPC) systems. It can utilize Container Library and Docker images, meaning users can benefit from the Docker images that already exist for MET.
Perhaps the biggest benefit of using Apptainer (aside from its agnostic platform availability) is its nonrequirement of root permissions. This can be one of the only ways users operating on large-scale, shared computing resources can access MET. That, plus the relatively simple installation of Apptainer and retrieval of Docker images, should help any users experiencing difficulties with MET installation using previous methods achieve success.
3.6.1. Installing Apptainer
To begin, download and install the correct version of Apptainer for the intended system. The method of installing from code is outlined in Apptainer’s INSTALL.md file on their GitHub page. If users require an alternate method to install Apptainer, the Admin guide will provide further details.
3.6.2. Loading the Latest MET Image
Similar to Docker, Apptainer will build the container based off of the
MET image in a single command. To accomplish this, Apptainer’s
“Swiss army knife” build
command is used. Use the the latest MET version number in
conjunction with build
to make the container:
singularity build met-12.0.0.sif docker://dtcenter/met:12.0.0
3.6.3. Running the MET Container
The container is now ready for usage! Simply use the exec
command to invoke the MET container, along with the appropriate
MET command line usage:
singularity exec met-12.0.0.sif plot_data_plane /home/data/fcst_006.grb2 image_output.ps ‘name=”TMP”; level=”Z0”;’
3.6.4. Stopping the Apptainer Instance
Once work is complete within the instance, the stop
command can be used to end the instance. This command will need to
be used otherwise the instance will continue to run in the background:
singularity instance stop /path/to/container/met-12.0.0.sif met-12.0.0
Now that MET is successfully installed, it is highly recommended to next install the METplus wrappers to take full advantage of Python integration. Users can also proceed to the Tutorial and run through the examples that only utilize the MET processes (METplus wrapper applications and commands will not work unless METplus wrappers are also installed).